Showing posts with label (04) ingredients. Show all posts

Kale, Tomato and Potato Hash

IMG_3595

As someone who very much enjoys cooking, entertaining, and feeding others, I am constantly in the market for an easy recipe that is also socially neutral.  I need dishes that are edible to my myriad of friends who have food restrictions.  I have friends who keep kosher; friends who are vegetarian, pescatarian, or vegan; friends who have gluten allergies or are gluten-sensitive; a friend who hates cheese; and even a friend who doesn’t like chocolate.  I know.  The last two just seem crazy, but wonderful people do exist who dislike cheese and chocolate!  That’s alright.  More for me, thank you!

This hash is a very easy dish that not only tastes good, it’s healthy, colorful, and steers clear of pretty much every dietary minefield.  It tastes delicious with parmesan sprinkled on top, but that’s optional.  This has become my latest go-to when I have guests.  My favorite way to eat it is with a side of hot buttered bread (french baguette, drizzled with melted butter, bake in the oven at 350° for 12-15 minutes, serve with your topping of choice – I love blackberry preserves).  Top that off with some fresh hot coffee, and I’m a very, very, happy, girl.


HappyBefore we go into the oven!  Such an easy recipe…. chop, layer, toss, bake.

IMG_3593
Out of the oven, piping hot and ready for zee close-up! 
Recipe Serves 4.
1 3-lb. bag of small yellow potatoes
4 Roma tomatoes
1 small bunch of kale
2-3 Tbsp. olive oil
1 tsp. salt
freshly cracked pepper

Lower the oven rack to the bottom third of the oven, and pre-heat the oven to 425°.

1. Rinse off the potatoes, tomatoes, and kale.
2. Chop enough potatoes until you have one layer in your roasting pan. (You can also use a glass casserole dish – any oven safe pan is fine.) Chop the tomatoes and add them to the potatoes. Tear the kale into small shreds and add them on top until the dish is covered. See above. 3. Sprinkle with olive oil, then add salt and pepper, and toss together. (I like to use my hands.)
4. Bake for 35 minutes, and serve hot.  Add salt and pepper to taste.

The Perfect Grilled Cheese Sandwich

Grilled cheese sandwiches are underrated.  They're often forgotten.  How many times have you wondered, what should I eat, while you had bread, butter, and cheese sitting in your kitchen?  Yup, that's what I thought.

I'm almost embarrassed to post this since it is so elementary... but I've had the unnecessary experience of eating a sad grilled cheese sandwich.  The perfect sandwich requires understanding of how to cook what, and when. Once you've got that down, you can do it in your sleep.  The way I cook this sandwich ensures a crisp and toasty exterior, with a hot, gooey, cheesy center.  I hate it when the bread is really crunchy and scrapes the roof of my mouth.  Don't you?

I wholeheartedly encourage you to get fancy with this sandwich.  What doesn't go well with melted cheese?  Add slices of tomato, bacon, caramelized onions, whatever you like.  The recipe below is the foundation for your perfect grilled cheese. I love pairing it with tomato soup, aka grilled cheese's match made in heaven!


IMG_2679Mmm, cheesey goodness.


Recipe  
2 slices of sandwich bread
1-2 tablespoons of Dijon mustard (optional) 

2 tablespoons of butter
Cheese, sliced (amount is up to you)

(1)  Heat a pan to medium.  If you're adding mustard or any other condiment, slather it onto one side of each slice of bread.
(2)  Add butter to the pan and, once it has melted, add both slices of bread (condiment side up).  Swirl the bread around the pan until all the butter is soaked up.  
(3) Add the cheese to one or both slices.  If you're adding other ingredients (such as tomatoes, bacon, etc.), put it on top of the bread now.  Let it toast, as is, for about one minute.  Lower the heat, and then flip one slice of bread onto the other and let toast for one minute.  

.  

Apple Pie with Whole Wheat Butter Crust

I recently had the BEST pie crust I have ever tasted: it’s buttery, it’s flaky, it’s crisp, it’s perfect…. It makes me want to make more and more pies!!

Every pie crust recipe I read says that the key to flaky crust is to keep the butter and water cold, including an approximate one hour chill time after the dough’s been formed.  However, I am not the most patient cook and I don’t want to chill the dough for an hour. This is my “quick” pie crust recipe, and it’ll give you a delicious, flaky, buttery crust that will have you running back for more.  Best part is, it’s easy to make, and doesn’t require extra chilling time.  This pie is best if eaten within 24 hours of cooling. 

Recipe for the Crust 
   Makes a bottom and a top crust for one pie
2 1/2 cups of whole wheat flour
1/2 teaspoon of salt
1 cup of cold, real, unsalted butter
1 cup of ice cold water

Recipe for Filling
    Adapted from America’s Test Kitchen
5 large apples, chopped (about 6 cups)
1 tablespoon of fresh lemon juice
1/2 cup of sugar
1/4 teaspoon cinnamon
1/4 teaspoon nutmeg
1/8 teaspoon allspice
1/4 teaspoon salt

Directions for the Crust and Pie Filling
(1)  Put a bowl of water into the freezer.  Stir the flour and salt together.  Dice the butter and incorporate the butter and flour together so that it looks like sandy/pebble-y crumbs.  I use my hands!  Get in there!  Don’t worry about not keeping it freezing cold, I promise, you’ll be fine.  Once the flour/salt/butter is the right texture (see below), put the bowl in the freezer while you prepare the filling.


IMG_2599
Sticks of butter, right before the final dice.  I actually looked at this and thought… “f*ck yeah.”

IMG_2601
“Sandy/pebble-y crumbs” 

(2)  Peel and core the apples.  Chop them into 8 wedges, and then chop each wedge into 4 pieces.  Once you have six-ish cups of chopped apples, mix in the lemon juice, sugar, cinnamon, nutmeg, allspice, and salt.  Set aside to let the fruit marinate.  Now, preheat the oven to 425°.

(3)  Take the ice water and crust mixture out of the freezer.  Sprinkle a tablespoon of ice water into the mixture and use your hand or a spatula to start folding the mixture into itself.  Keep adding water until the entire mixture is sticking together (I use between 5-10 tablespoons).

(4)  Flour your surface, divide the mixture in half, and roll out the dough for the bottom crust.  The dough is large enough when it’s about 1.5 inches larger than your pie pan.  Once the bottom crust is in the pan, remove extra dough from the outside of the pan with a knife.  Then roll out the top dough.  Add the apples to the pie pan and cover with the top dough.  Use the flat part of a fork to cinch down the sides of the pie, and then remove excess dough with a knife.   

          Now, my dough never comes out in a perfect circle, but there’s a “quick and dirty” way to get it perfect.  My mom taught me to just cut off weird edges and roll them into the spaces that are needed.  To easily transport the dough to the pan, I recommend rolling it out over parchment and then flipping the parchment over the pan, dough side down.  With all-purpose flour crusts, you can fold the crust into quarters, but the whole wheat crust doesn’t seem to like that and rips.  My first crust actually ripped almost entirely in half when I folded it, and I had to do some fixing.
          I also like to use the extra dough to cut out shapes for decorating the pie.  Or, I shape them into little cookies and put them in the oven 15 minutes before the pie is done.  They’re so good by themselves, or with peanut butter, or preserves.

 
IMG_2606
Ha… you can actually see my wine bottle/rolling pin in the corner. Wine bottles work great as rolling pins.

IMG_2607
IMG_2608
IMG_2609

(5) This crust is flaky and crisp at the same time, so I suggest cutting vents into it along the shape of the pieces you want.  Otherwise, the crust will break up when you cut it.  Bake at 425° for 25 minutes, then lower the heat to 375° for 30 minutes.  Allow it to cool for a few (2-4) hours.

IMG_2614
IMG_2617
Can you see how thick that crust is?  It’s my and my family’s favorite part of the pie.
IMG_2622
Mmm, flaky layers of delicious whole wheat crust....

IMG_2624


Dao Si Pai Guet (Black Bean Spareribs)

IMG_1710
Oh my goodness, this dish is soooo goooood ^_^

Dao si pai guet, aka black bean spareribs, is one of my all-time favorite dishes!  If I got to choose my last meal on earth, this would be it.  Just thinking about it is making me drool.  Chinese black beans (dao si in Cantonese or dou shi in Mandarin) taste very different from the black beans you might be used to eating.  Dao si is fermented and salty.  (I’ve only found them in Asian food stores and recently discovered you can buy them online).  Part of the allure for me probably lies in the fact that it’s hard to find really good dao si pai guet.  Instant dao si in grocery stores is not the real thing.  And forget about finding a restaurant to try this delicious dish.  Ninety-nine percent of the time they don’t have it, or if they have it, it’s not worth eating.  Restaurants’ dao si is usually immensely watered down.

The strangest part of not being able to find good dao si pai guet at restaurants is that it is SO VERY EASY to make.  So… I’m going to share my mom’s family recipe with you (my paternal grandmother’s recipe is a little different).  If you want to experiment, please do so by all means.  But with this dish, I personally think that less is more.  This recipe yields very tender meat with bold and fragrant flavors.  It will make you close your eyes and smack your lips.  I love popping a bite into my mouth, stripping the bone of its meat and sucking out all the marrow.  And the sauce – oh my goodness, don’t even get me started!  I can eat a salad bowl full of hot, freshly made rice drizzled with this sauce all over it.  NOM NOM NOM….

I make dao si pai guet with small and big pork ribs.  If you want small ribs, ask the butcher to cut the rack into 1” strips, lengthwise, then cut it up further into 1”x1” chunks.  Sometimes I do that last part myself.  I especially love getting fatty pork ribs (they say southern style on the package) and making this recipe.  What a treat!!  I hope you try this recipe and enjoy it as much as my family and I do.  ^_^

This recipe serves about 6.*

Desktop1
Doo doo doo, nothing to see here, just a bunch of beans and garlic cloves hanging out ^_^

Recipe

1 lb of meat (can use pork, beef, etc. I've even tried it with oxtail)
1/4 cup of fermented black beans (dao si)
2 medium to large cloves of garlic
1 cup of water

(1) Rinse the meat and cut to desired size, if needed.  
(2) Blend the beans and garlic into a paste.  Adding a little bit of water helps.  I like to use a mortar and a pestle, but you can use a food processor or blender, too.
(3) Brown the meat in a big pot, then add the bean paste and water.  Stir it all together.  Bring it to a boil and then turn it down to simmer for 40 minutes.  Make sure the sauce is simmering and bubbling over the meat.  If it isn't, turn the meat over at the 20-minute mark.

My mom says: each stove is different.  If there isn't enough sauce, you can add starch and water.  Mix 1 tablespoon of starch (corn or tapioca) with 1 cup of cold water.  Mix it well.  Stir the meat while adding the starch mix to get an even mixture.

Campfire Coffee + Mocha

A small cup of coffee
Courtesy of Julius Schorzman.

A few weeks ago, I realized my coffee press was cracked.  It faithfully served me delicious cups of coffee for two years.  I tried making coffee in it anyway, but it leaked immensely.  So sad!  K's father told me how to make coffee around a campfire, and I tried it at home.  It worked like a charm.  I made a huge, soup pot full of coffee and we (K, his parents and I), enjoyed chilled glasses of coffee with milk and brown sugar, with a side of freshly baked banana bread and butter.  YUM!

I ordered a new press, but have been using the campfire method for a few weeks now.  I love it!  It is ridiculously easy to make coffee this way.  I almost feel that coffee makers are unnecessary purchases.  On top of it being a money saver, I was doubly happy because now, when I go camping, I can still have my coffee without bringing anything but a pot.  Sweet!  I really hope you try it. 

The recipes here serve 2 cups (8 oz. each) of coffee.

Salt and Cracked Pepper Encrusted Roasted Baby Potatoes

roasted fingerling potatoes

This is a really easy, delicious and foolproof recipe for roasted potatoes!
 
This recipe gives you a crisp, salt and pepper encrusted crust with pillowy flakes of soft, steaming potato inside.  How can you not fall in love with that?  Plus, this makes for wonderful and easy leftovers!  I just pop a couple into a container and they’re a healthy, tasty, satisfying side dish for my lunch. They're also great for picnics and road trips, because they don't require utensils or refrigeration. 
Roasted potatoes are in my Top Five of favorite types of pure potato dishes.  Rounding out my Top Five would have to be fries, tator tots, butter/garlic mashed potatoes, and steamed butter potatoes.  Oh wait… I almost forgot about baked potato skins with bacon, sour cream and chives!  Oooh, and skillet-fried hashbrowns!!  Mmm…. okay.  Top Seven.  Hee hee.

I like to use the little, baby gold potatoes that are about two-inches wide.  Serving size varies on how many potatoes each person wants to eat.  I usually buy a bag-full and roast them all.  (Mass cooking saves you time AND money.)  Because this recipe is so simple and everything is to taste, I’m going to try a new recipe format.  Edible items you need are in bold.  Here goes!

* * * RECIPE * * *

Lower the oven rack to about 18" away from the top.  Turn the oven on to broil.  Line a roasting pan or cookie sheet with foil.  Wash the gold baby potatoes.  In a large bowl, lightly coat the potatoes with olive oil, salt, and freshly cracked black pepper.  Toss to evenly coat.  Pour the potatoes into the pan/sheet and broil uncovered for 40-50 minutes.

Roasted Potato Fries

I love potatoes in pretty much every form I’ve come across: sweet, fried, baked, twice baked, mashed, scallopped, roasted, salad, chips . . . .  

Here is a very easy recipe for roasted potatoes adapted from a recipe shared with me by my friend, c is for cindy.  I make them in wedge form, but you can cube them or leave them halved, if you like.  I prefer using Yukon potatoes – they’re so creamy – but you can also use red potatoes.  Any potato with low starch (e.g. waxy potatoes) are a good choice because they’ll keep their shape.  
2010

Taiwanese Pork and Potato Stew


In honor of Mother’s Day . . . .

Xmas 83a{ Christmas, 1983.  L-R: me, my mom, and one of my sisters. } 

My parents were my alarm clock growing up.  While my dad would pull boyish pranks to get me out of bed – grabbing my comforter, for instance, and whisking it out of the room – my mom used more gentle persuasion: bacon.  No matter how tired I was, my consciousness swam through layers of sleep and immersed fully piqued whenever my mom decided that bacon was on the menu for breakfast.  I would awake to find my mom sitting on my bed, waving a piece of bacon under my nose.  She would feed me a small piece.  “Qi chuang.  [Rise out of bed.]  There’s more downstairs.”  Getting up was easy when there was bacon on the horizon. 

I think I was twelve when I realized that my mom is a Superwoman.  She met my father in Taiwan and, after ten years with him, fearlessly agreed to move our family to the United States where she knew no one.  She raised my two sisters and me with a firm hand.  We may have run wild sometimes, but never outside of the home.  Strangers would approach our parents to compliment them on how well-behaved we were.  Seemingly tireless, my mom cared for my dad and my sisters, held a job, and always made it home in time to greet us from school.  She made our meals from scratch and we learned to appreciate where our food came from.  She had her own vegetable garden and taught us how to compost.  Through her traditional Chinese cooking and teaching, we developed a wide, diverse, and adventurous palate.  By her example, we learned to value the animals that died to sustain us, and avoided being wasteful.  We didn’t bat an eye at drinking shrimp and crab “brains,” or eating marrow.  My sisters and I can all efficiently take apart a lobster and eat everything that can be eaten.   

My mom had the magic ability of never making my sisters and me feel like we were interrupting her when we had a new cut on our knees, gum in our hair, or just wanted to be around her.  She still has that magic.  She taught us the multiplication tables and how to pick crisp apples and sweet blackberries.  She encouraged us to study hard and even gave us extra homework to do.  When we were sick, she fed us her wondrous chicken soup.  We never doubted that she loved us, or was there for us. 

I gain strength from my mom.  She exemplifies the ideals she believes in.  She is a sharp, organized, intuitive, unflappable woman who can cook, sew, sing, dance, tell stories, fix computers, and find the best bargain on anything.  My mom is very practical, and a fast learner.  She speaks four languages fluently.  She is so perceptive that, when she listens to you, she can hear the things you aren’t saying.  She has a wonderful sense of humor, and a sweet sense of propriety: her version of road rage is calling the other driver “buddy.” 

My mom doesn’t just believe in the power of the family, she has defined our family.  While my dad worked long and demanding hours to support us, my mom was at home making sure we didn’t turn into criminals.  If my dad couldn’t be home for family dinner, my mom packed dinner, my sisters and me up, and we’d have dinner with him at work.  Throughout my life, she has nourished our family with her food, sound judgment, patience, and love.  She is also one of the wisest people I know.  When I was little and wasn't sure what to do, I would wonder, what would mommy do? When I’m feeling perplexed or uncertain, I consult her like a Magic 8 Ball.  Somehow, she always knows what to say to give me clarity and perspective.  She is fair, direct, and honest, and the world is better for having her in it. 

Today I’m sharing one of my mom’s recipes, and a family favorite:  Taiwanese Pork and Potato Stew.  This is a classic Mom recipe because it has just a few ingredients, requires minimal labor, and is very affordable.  This dish serves 5-6 people and it cost me $4.23 in groceries.  The secret ingredient is love.  I hope this dish becomes a family favorite for you, as well. 

I love you, Mom.  Thank you.


Serves 6-8.

Fullscreen capture 5172010 22832 AM.bmp

* If the stew isn’t thick enough to your liking, mix cold water and corn starch in a 1:2 ratio (start out with 1 tablespoon of water) in a bowl.  While the stew is simmering, pour the corn starch/water into it and stir simultaneously.
 
DSC05852   

Peanut Butter & Chocolate Kiss Cookies

cookie1

I can't decide what to call this cookie... I vary between: Crispy Kisses (because they're crisp, not chewy), Lazy Kisses (because the recipe is so simple)
, Peanut Butter Poppers (because the cookies are small enough to pop into your mouth), and Peanut Butter & Chocolate Kiss Cookies (self-explanatory).

One of the joys of the holiday season is the increase in baked goods. The amount of processed sugar in most baked goods decrease their health rating, but I think it's a little silly to be extremist and avoid baked goods altogether. Balance is key in most things and a little bit of sugar isn't going to tip the scales.

Whatever you call this cookie, this little treat is a great way to share home baked goodies with loved ones and office mates. Since this recipe makes 65 cookies, you can share them with a lot of people. If you want to hand them out as party favors or presents, this recipe takes care of at least thirteen people (if you divvy out five cookies per person). And all it takes is one hour! I know the spirit of the season is generosity, but I sure do appreciate efficiency. :)

I love this recipe because it's so darn easy to remember and doesn't take long to make. It also combines two of my loves: chocolate, and peanut butter. This recipe is floating around the internet and all over the place. Now I share it with you. :)

Ingredients
1 cup of granulated white sugar
1 egg
1 cup of peanut butter
65 chocolate kisses, approximately (also more popularly known as Hershey's kisses)

Directions
1. Preheat oven to 400 degrees.
2. Mix all of the ingredients together and put the mix into the fridge for 10 minutes to set the batter. This will make it easier to roll the batter.
3. Roll the cookie batter into one teaspoon balls and place on a cookie sheet.
4. Bake in the oven for approximately 8 minutes.
5. When you take the cookies out of the oven, place a chocolate kiss in the middle of each one.
6. Transfer the cookies to a cold baking sheet to cool.


cookie2

Chinese Chicken Soup

This is a delicious, healing, soul-satisfying recipe that is originally my mother's recipe. Many times, I have recreated it from memory with some of my own touches. It's a wonderful soup that I crave when I need comfort food or am under the weather. Since this recipe has been orally passed down on both sides of my family, I have no idea what the measurements are and eyeball everything. Thus, all the measurements below are estimates. Feel free to add things to your taste!

The essential ingredients make a wonderful chicken stock that you can freeze and use later.  The prep time is very little, but you'll need a couple hours of simmering so that the soup has a robust, full flavor. 

Essential Ingredients
A large stockpot - at least 5 quarts
Chicken - 2 lbs approximately, preferably thighs or legs (tastier), bone in and skin on
Water - about 4 quarts
Salt

Optional Ingredients
Ginger (highly recommended) - 10 to 15 slices depending on how you like it
Garlic - 3-5 cloves, crush under a knife
Soy sauce
Scallion
Shitake mushrooms, dried (but fresh will work too)
Rice or Pasta
Vegetables - Napa cabbage, carrots, celery, and more....

Directions
For basic soup, follow the directions below. The instructions for the optional ingredients are in parentheses.
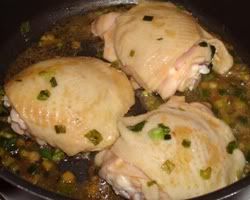
1. Rinse the chicken and put it in the pot. Turn the heat on to medium and cook the chicken with some salt. (Add soy sauce and chopped up scallions.) Occasionally stir the chicken until all of the outside is cooked and browned.
2.  Add cold water to about 2-3" below the rim of the pot. (Add the shitake mushrooms and garlic.)
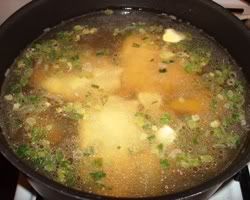
3. Cover and bring to a boil. Once it boils, lower the heat to simmer and scoop out any foam from the top.  Cover the soup and lightly simmer for at least two hours.  (Add 10-15 slices of fresh, unpeeled ginger 15-20 minutes before you turn off the heat.)
4. Once the soup's done bubbling away, I like to bring it to a boil again and scoop out any more foam from the top.  Add salt to taste.   (If you want to get rid of the fat, the best way to do it is to refrigerate it. Any fat will rise to the surface and harden, making it easier to scoop out. I keep it in though; animal fat is good for you!)
5. Shred the chicken in the pot with a knife. It'll be so soft, it'll come right off the bone.

Soup's done!

How to prepare the other optional ingredients:
- Rice: Time the rice to cook so that it's finished when the soup is finished. Rice takes 20-30 minutes, depending on whether you use the stove or a rice cooker. Add to individual bowls when you serve. Never add to the soup directly; if it's not eaten right away it will absorb the soup and turn into mush.
- Pasta: Make pasta in a separate pot and add to individual bowls when you serve. Never add to the soup directly; if it's not eaten right away it will absorb the soup and turn into mush.
- Vegetables: Cut everything so that its bite-sized and stir fry it in a separate pan; garlic and salt are optional. Add to individual bowls when you serve. If there are leftovers, you can add the vegetables to the soup pot.

There are a few ways you can keep leftover soup:
- Keep it on the stove. The soup is even better the next day. Just make sure to boil it once a day! The soup will be good for about five days.
- Keep it in the fridge. Keep the soup in the pot or ladle it into containers. The soup will be good for about five days. If you boil it every third day, it'll keep for even longer.
- Freeze it. Put the soup in (a) nonstick muffin tins, (b) ice cube trays, or (c) quart-sized plastic bags. If you put the soup in muffin tins or ice cube trays, place the blocks of soup in plastic bags once they're frozen.


Photobucket Photobucket Photobucket
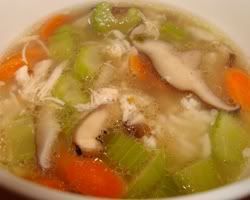
{ In this version, I cooked three chicken thighs with soy sauce and scallions, and added ginger and shitake mushrooms. When I served it I added rice, chopped celery and chopped carrots. }

Teriyaki Chicken

Screen Captures

My mom has a delicious and ridiculously easy teriyaki recipe that never fails to satisfy.  She is the resident cook in the family and she kept a family of five happily fed with food made from scratch, while also juggling a job. A superwoman, that one. One of her tricks was to create recipes that involved little actual work. Here is an example of one of them.  As a testament to her skills and palate, I don’t like teriyaki, but I’ll eat hers in a heartbeat.  Most teriyaki sauces are cloying and overly sweet.  You can barely tell that it’s chicken you’re eating.  No thank you.

When you get to the “bring to a simmer” part of the recipe, make sure that the sauce is bubbling over and covering the chicken within a minute or two.  (See the picture, bottom row, right side.)  This ensures that the chicken is marinating in the sauce the entire time.  Don’t worry about the chicken being overdone or dry.  Once the chicken is finished cooking, the meat is so tender it practically falls off the bone.  :)

Fullscreen capture 6262010 55912 PM.bmp